


DIY Dream: How to Install a Bathroom Vanity Like a Pro (Without Calling One)
 Quick Read
Installing a bathroom vanity might seem like a daunting DIY task, but with the right tools, patience, and a bit of humor, it becomes an incredibly rewarding experience.
Getting Ready: How to Plan and Prep for Vanity Installation
Before you start ripping out your old sink with a vengeance or unboxing your shiny new vanity, take a breath. Planning is half the battle when it comes to any home improvement project — especially one that involves plumbing, carpentry, and a fair bit of patience.
Ask yourself: What kind of bathroom vanity suits your space? Are you going for a sleek modern floating vanity or a more classic cabinet-style piece? Will you need single or double sinks? Does your bathroom have enough clearance for drawers and doors to open freely? Measure twice — heck, maybe even three times — and write it all down.
Here’s what you’ll need before the first screw is turned:
- Measuring tape (an absolute must!)
- Stud finder
- Level
- Screwdriver or drill
- Plumber’s putty and Teflon tape
- Adjustable wrench
- Utility knife
- Silicone caulk
- Bucket, rags, and a lot of patience
And let’s not forget the vanity itself. It should arrive intact and with all components (including the countertop and sink if it’s a combo). If you’re buying it online, be sure to check reviews — you’d be surprised how many “solid wood vanities” turn out to be particleboard disappointments.
Pro Tip: Always shut off the water before you begin anything. No one wants an impromptu bathroom geyser.
Out with the Old: Removing Your Existing Bathroom Vanity
Say your goodbyes. That old vanity has probably seen better days — makeup spills, toothpaste smears, water damage, and maybe even a few mystery stains. Removing it is usually straightforward, but it can get messy fast.
Here’s how to break up (with your old vanity):
- Shut off water supply lines under the sink using the shutoff valves. Open the faucet to drain out any remaining water.
- Disconnect plumbing. Unscrew the supply lines and the P-trap. Use a bucket to catch any water lurking in the pipes.
- Remove the countertop. If it’s glued down, carefully cut through the caulk with a utility knife and pry it off gently. Avoid damaging the wall — unless you’re in the mood for drywall repair later.
- Unscrew the vanity from the wall. Most are secured with a few screws into the wall studs. Once removed, pull the vanity out and clean the area thoroughly.
You may discover some surprises — uneven floors, mold, or an awkwardly placed pipe. Don’t panic. These are common, and we’ll handle them.
Pro Tip: Take photos of your existing plumbing before dismantling anything. It’ll be your cheat sheet when reassembling later.
Bringing in the New: Step-by-Step Vanity Installation
Now comes the fun part — putting your new bathroom vanity in place! This step is exciting because it finally starts to look like progress. But don’t rush. Precise installation is key to making sure drawers line up, doors swing open properly, and everything is nice and level.
Here’s how to get it done right:
- Dry fit first. Place the vanity in position to make sure everything aligns — especially the plumbing holes. You may need to cut out space on the back of the vanity to accommodate pipes.
- Level it out. Floors, especially in older homes, are rarely perfectly flat. Use shims under the legs to make the vanity level.
- Mark your wall. Once it’s in the right place, use a pencil to mark where the mounting screws should go.
- Find the studs. Use a stud finder to locate solid anchoring points. Secure the vanity to the wall using wood screws driven into the studs. If there’s no stud where you need one, use wall anchors designed for heavy loads.
- Secure everything tightly. Double-check for level, and ensure it’s snug against the wall.
Pro Tip: If you’re installing a floating vanity, wall strength is everything. Use blocking between studs or special brackets designed for the weight of the unit.
Setting the Surface: Installing the Countertop and Sink
Time to add the crown jewel of your bathroom upgrade — the countertop and sink. Whether it’s quartz, marble, granite, or a budget-friendly composite, this step brings that polished, finished look.
Steps to install the countertop:
- Dry fit again. Place the countertop on the vanity to ensure a perfect fit. Check alignment with the walls and make sure the sink hole (if separate) matches up with the plumbing.
- Apply adhesive. Use silicone adhesive or construction adhesive around the top edges of the vanity base.
- Set the countertop. Lower it gently into place, press firmly, and wipe away any excess adhesive that squeezes out.
- Install the sink. If it’s a drop-in or undermount model, apply plumber’s putty around the drain flange and secure it tightly.
- Reconnect the plumbing. Reattach the P-trap and water supply lines using Teflon tape to avoid leaks.
Pro Tip: Run water slowly at first and check for leaks. It’s much easier to fix small drips now than to repair water damage later.
Seal the Deal: Final Touches for a Flawless Finish
Let’s wrap this project up with finesse. This phase might seem minor, but it’s where good installations become great ones. A poorly sealed vanity can lead to long-term issues like water damage, mold, or lifting countertops.
Final tasks to finish like a pro:
- Seal the edges. Use waterproof silicone caulk around the edges where the vanity meets the wall and where the sink meets the countertop. Choose clear or a color that matches your materials.
- Recheck for level and tightness. Things may have shifted slightly during installation — now’s the time to fix them.
- Install knobs or pulls. If your vanity didn’t come pre-installed with hardware, measure carefully and drill pilot holes before attaching.
- Clean everything. Remove smudges, fingerprints, and leftover construction dust.
Pro Tip: Give the caulk at least 24 hours to cure before using the sink. Trust us, patience pays off.
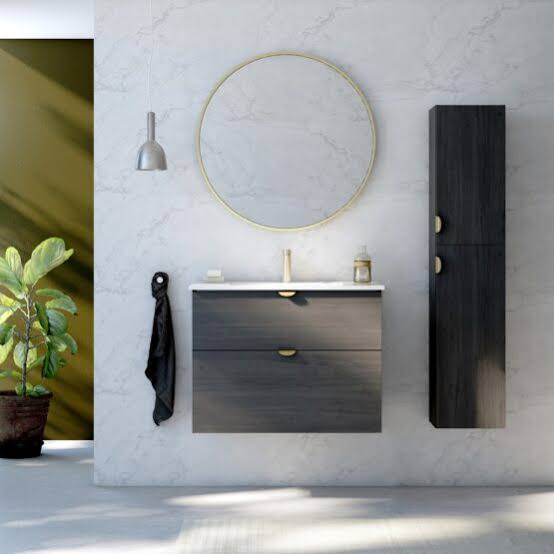
Style and Function: Choosing the Right Vanity for Your Space
Let’s talk style! A bathroom vanity isn’t just functional — it’s a major design element. Choosing the right one can set the tone for your whole bathroom.
Consider the following:
- Size and proportion. Don’t overcrowd a small bathroom with a bulky vanity. A floating vanity creates the illusion of space.
- Storage needs. Drawers, open shelving, and under-sink cabinets all serve different purposes. Think about what you really need.
- Style match. Coordinate with your mirror, faucet, lighting, and tile. If your vanity is rustic farmhouse but the rest of the room is sleek and modern, it’ll feel disjointed.
- Color and finish. White vanities are timeless, but bold navy, sage green, or matte black options are trendy and elegant.
- Eco-friendly materials. Look for FSC-certified wood or vanities with low-VOC finishes if sustainability matters to you.
Trending features in 2025:
- Integrated LED lighting
- Smart mirrors with defoggers
- Touchless faucets
- Built-in USB ports
- Quartz-integrated sinks
Pro Tip: Buy a vanity with soft-close hinges. It’s a small touch that adds big luxury.
Conclusion: Install It Right, Enjoy It Longer
Installing a bathroom vanity might seem like a daunting DIY task, but with the right tools, patience, and a bit of humor, it becomes an incredibly rewarding experience. From the first screw to the final polish, every step you take adds value not just to your bathroom — but to your home.
And let’s be honest — there’s something pretty satisfying about stepping back, admiring your work, and thinking, “Yeah, I did that.”
So whether you’re doing a total remodel or just giving your space a quick refresh, remember: a vanity is more than a sink and a cabinet. It’s the centerpiece of your bathroom — and with this guide, you’re more than ready to install it like a pro.
Comments